FOUND OBJECT: PLASTER AND CLAY
Part 1
3-D Design Project
Problem: Create three, two part plaster molds of found objects that are related by concept.
Objective: To begin to learn the basic construction of 2 part molds by using plaster, to become familiar with how to identify draft in mold design, and to understand the importance of utilizing molds for production of the same object.
Materials: Plaster, cardboard, wood, murphy’s oil soap, paint brush, and duct tape.
Strategy:
Analyze the three objects you have chosen and use a marker to identify how the mold will draw away from the
3-D object.
Using clay and wood as a dam with duct tape to seal all gaps and leaks, cast the first half of each mold. (do not forget to make large shallow keys in the clay)
After the first half is cast and cured, cast the second half of mold using the first half as a guide. (make sure all surfaces are covered with mold soap so the mold comes apart)
Focus on the craftsmanship of each mold. The mold will only look as good as the dam created for the plaster and the plaster must be mixed correctly for the mold to work correctly.
IMPORTANT:
-Check with your instructor to make sure you have the draft identified correctly before beginning.
-Use of clay as a dam requires casing plaster immediately.
-Plaster must be cast as soon as it is mixed.
-Plaster must be cast as soon as it is mixed.
ALL OBJECTS USED MUST BE BASIC IN FORM AND HAVE ALL DETAILS FILLED WITH CLAY
ALL OBJECTS CHOSEN MUST HAVE SOME TYPE OF CONCEPTUAL RELATIONSHIP
PLASTER MUST BE MIXED CORRECTLY AND CURE AT LEAT 30 MINUTES BEFORE REMOVING ANY DAM OR BREAKING THE MOLD APART
Accuracy of measurement for plaster and water will be important.
__________________________________________________________________________________
__________________________________________________________________________________
The following link explains how to mix plaster correctly for mold making:


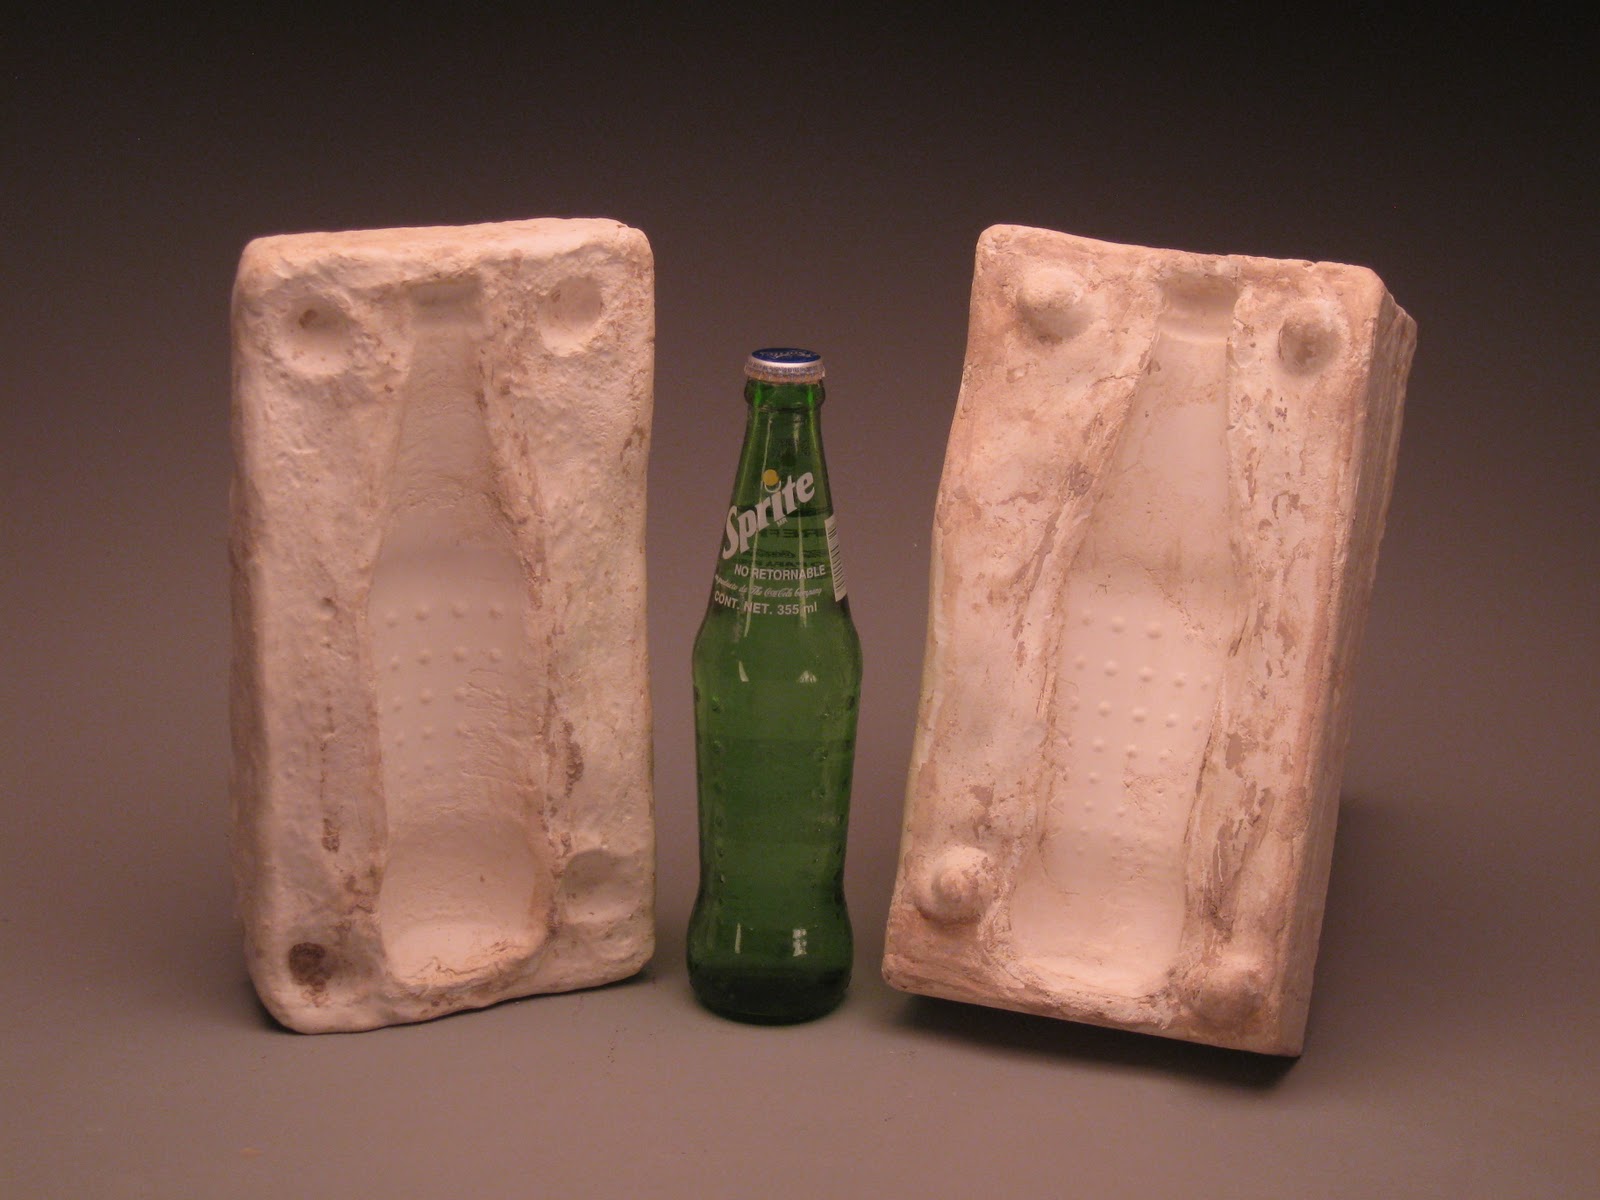
examples of student made 2 part molds

__________________________________________________________________________________
PLASTER AND CLAY PART 2
Problem: Create sculpture from clay by using the two part plaster molds made in part 1.
Objective: Learn the basic use of 2 part molds for making hollow objects out of clay, to become familiar with how to construct a sculpture from clay, and to understand the importance of utilizing the stages of clay for successful construction.
Materials: Clay, Slip, x-acto knife, paintbrush, and cornstarch as a mold release
Strategy:
Analyze the three objects you have chosen and make a sketch that shows how you will assemble three objects from each mold into a composition (9 molded objects in the composition total).
The objects should have a relationship and orientation that conveys a concept.
Press form 3 objects from each mold and keep them under plaster
Once all of the molded objects have dried to the leather hard stage, assemble the objects into a sculpture.
Focus on the craftsmanship of each molded object as well as the construction of the final composition.
IMPORTANT:
-Make sure all enclosed forms made from clay have a hole for air to escape!!!
-All connections must be scored and slipped.
-Reinforce all connections with a coil on the exterior as demonstrated in class.
-All projects must be finished by the prescribed date to be dried and fired.
-Your final piece must employ the principals of design as well as an ideological concept.
-All projects must be finished by the prescribed date to be dried and fired.
-Your final piece must employ the principals of design as well as an ideological concept.
ALL CLAY OBJECTS CREATED MUST BE NO THICKER THAN ½ INCH
ALL FINAL PROJECTS MUST HAVE SOME TYPE OF CONCEPTUAL IDEA YOU ARE TRYING TO CONVEY TO THE VIEWER
IF THE MOLDED COMPONENTS START TO CHANGE TO ALIGHT GRAY CLOLOR, YOU HAVE WAITED TOO LONG TO ASSEMBLE THEM AND THEY WILL HAVE TO BE MADE
an example of this assignmnet after construction is complete.
(note the idea of weight and slow growth conveyed through the objects chosen by the maker)

_____________________________________________________________________________________
PLASTER AND CLAY PART 3
Problem: Create a color schematic related to the color wheel that reinforces the concept for your sculpture.
Objective: Learn the basics of color and color combinations with regard to the color wheel, execution of a color combination related to the color wheel, and to understand the importance of color for the development of a center of interest.
Materials: Paint and paint brushes.
Strategy:
Analyze the sculpture you have created out of clay from the molds you have made and select an area you wish to develop as a center of interest.
Select a color combination that is either complimentary or analogous
Paint your sculpture with your color combination using tints and shades for variation
Develop your center of interest by using a color that does not belong to your chosen color combination
IMPORTANT:
-Dulling of hues is acceptable as long as your chosen color scheme is prominent.
-Use detail in the area you wish to be your center of interest.
-Use separate colors to delineate each object.
-All areas in the sculpture should be painted and no areas on the sculpture should show raw clay.
ALL PAINTING MUST HAVE SOME TYPE OF RELATIONSHIP TO THE CONCEPT OF YOUR PIECE-All areas in the sculpture should be painted and no areas on the sculpture should show raw clay.
___________________________________________________________________________________
THE FOLLOWING LINK PROVIDES INFORMATION ON BASIC COLOR THEORY:
http://www.tigercolor.com/color-lab/color-theory/color-theory-intro.htm#Color_Wheel
__________________________________________________________________________________


left photo: a completed project with the center of interest devloped by using a contrasting color. (note the implied line created by the pointing of the bottle towards the open end of the cup)